art lesson may 4-8
This week we will be creating "Mural Art to Make People Smile"
Start by watching this YouTube video reading of our classroom book, Maybe Something Beautiful written by F. Isabel Campoy and Theresa Howell, illustrated by Rafael Lopez. www.youtube.com/watch?v=nL5TzKaDXzA
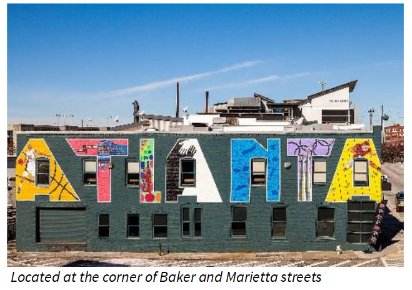
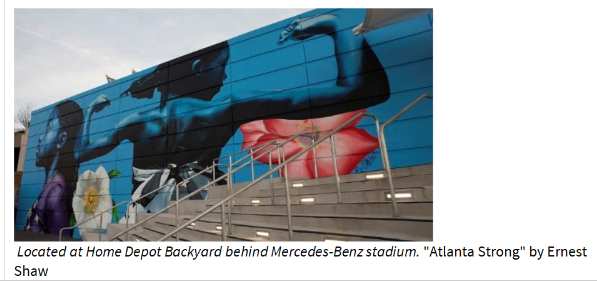
In the book, "Maybe Something Beautiful" Mira meets a man with an art job. What does he do? Yes, he’s a muralist. A muralist is an artist who designs, paints and/or creates large paintings on walls and ceilings. Some cities hire muralists to paint on public buildings or structures.
Have you ever seen murals around your area before?
Here are some examples from towns in our area:
Start by watching this YouTube video reading of our classroom book, Maybe Something Beautiful written by F. Isabel Campoy and Theresa Howell, illustrated by Rafael Lopez. www.youtube.com/watch?v=nL5TzKaDXzA
In the book, "Maybe Something Beautiful" Mira meets a man with an art job. What does he do? Yes, he’s a muralist. A muralist is an artist who designs, paints and/or creates large paintings on walls and ceilings. Some cities hire muralists to paint on public buildings or structures.
Have you ever seen murals around your area before?
Here are some examples from towns in our area:
|
|
After looking at these examples, use your best drawing/painting/coloring skills to:
1) Create an artwork for someone that will put a smile on their face. Think about what they like and put that in your artwork.
2) Take a photo of your artwork and text or email it to the person you made it for. You could also mail them the artwork or photo with a letter. 3) How could you turn your artwork into a mural? Where would you paint your mural? Why?
Feeling inspired?
Create an artwork for your neighborhood! You can make a sidewalk chalk mural, create art from nature, or make and artwork and hang it in a window. Always ask for help from adults when you use art materials!
art lesson april 27-may 1
Art Zoom with Mrs. Stevens on Tuesday, April 28th! Meet me on Zoom (link found on your teacher's classroom blog)
from 12-12:30 pm for a fun art lesson!
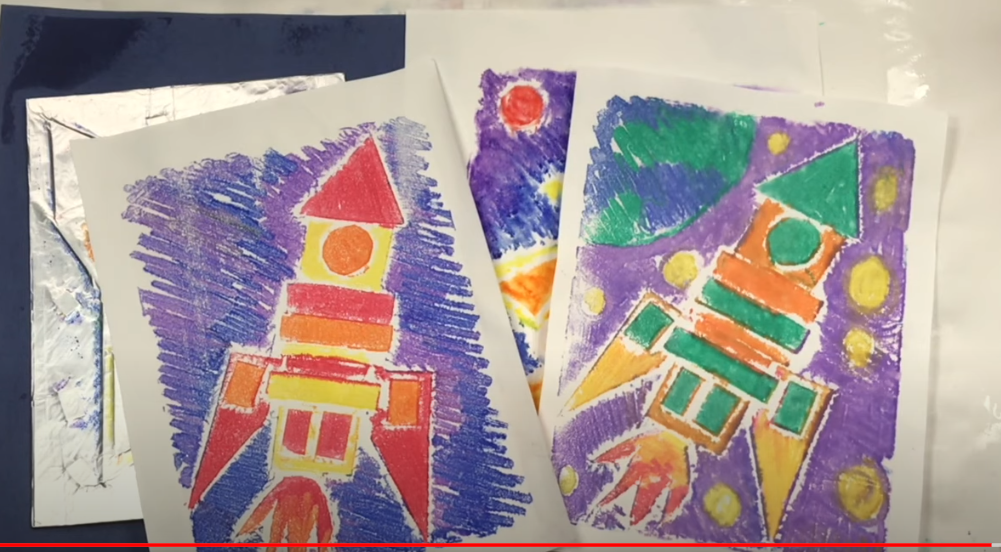
Below are the step by step directions for the Rocket Ship Collagraph Printmaking I am going to demonstrate during our Zoom meeting.
During our Zoom meeting, I will be demonstrating how to make a really cool print called a Collagraph. I'll demonstrate and then you can try your own at home when you have your supplies gathered :)
Supplies Needed:
sheet of foil
cereal box (or piece of thin cardboard)
scissors
glue (liquid or glue stick will work)
sponge
bowl of water
markers (permanent markers will NOT work for this!)
piece of paper
If you already have your supplies gathered and ready to go for our Zoom meeting, then you can work along with me. BUT, if you need time to gather your supplies, I suggest just watching me demonstrate during our Zoom and then following the tutorial below at your own speed at home:
www.youtube.com/watch?v=YNnbjCWJzp4
Here is an example of what our prints will look like:
from 12-12:30 pm for a fun art lesson!
Below are the step by step directions for the Rocket Ship Collagraph Printmaking I am going to demonstrate during our Zoom meeting.
During our Zoom meeting, I will be demonstrating how to make a really cool print called a Collagraph. I'll demonstrate and then you can try your own at home when you have your supplies gathered :)
Supplies Needed:
sheet of foil
cereal box (or piece of thin cardboard)
scissors
glue (liquid or glue stick will work)
sponge
bowl of water
markers (permanent markers will NOT work for this!)
piece of paper
If you already have your supplies gathered and ready to go for our Zoom meeting, then you can work along with me. BUT, if you need time to gather your supplies, I suggest just watching me demonstrate during our Zoom and then following the tutorial below at your own speed at home:
www.youtube.com/watch?v=YNnbjCWJzp4
Here is an example of what our prints will look like:
april 20-24
- Tri-fold a piece of paper and label each of the three parts with:
- 1) SEE, 2) THINK, 3) WONDER.
- Visit the website link that has many examples of art from all over the world. Pick 1 piece of art in the “Animals” collection.
- Website link: https://www.rawpixel.com/category/53/public-domain?sort=trending&filter=animals&page=1
2- What do you think? What do you think is going on? Do you like the piece? Why or why not. How does it make you feel?
3-What do you wonder? What does this make you wonder? What questions do you have?
Take notes on your tri-fold paper documenting what you SEE/ THINK/ WONDER about with the piece of art.
Share your notes with a family member.
THEN, Create your own work of art in the style of the artwork you analyzed.
Need help getting started? Watch this YouTube video to help understand how we critique art using “See/ Think/ Wonder”: https://www.youtube.com/watch?v=OFkMEGHR2Ek
|
|
|
art lesson April 13-17
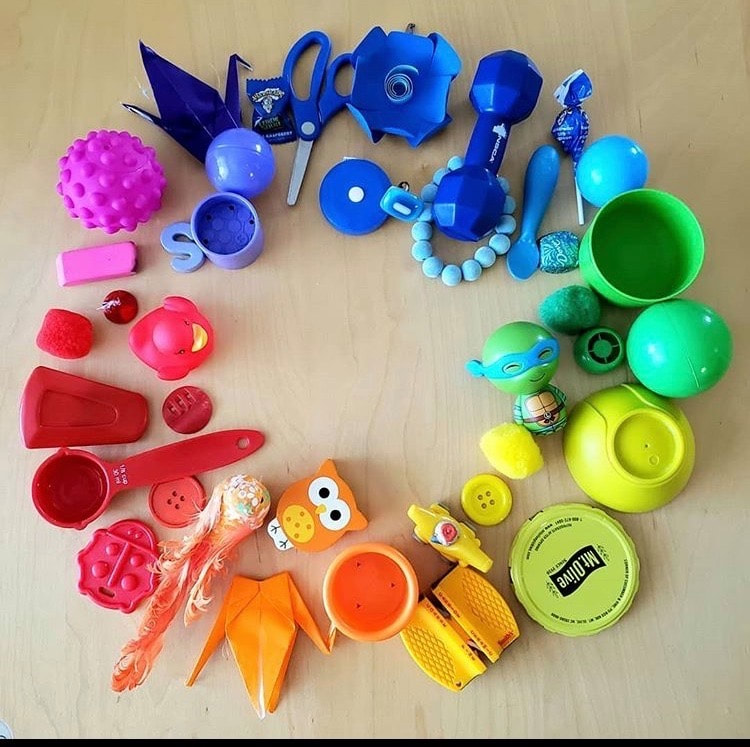
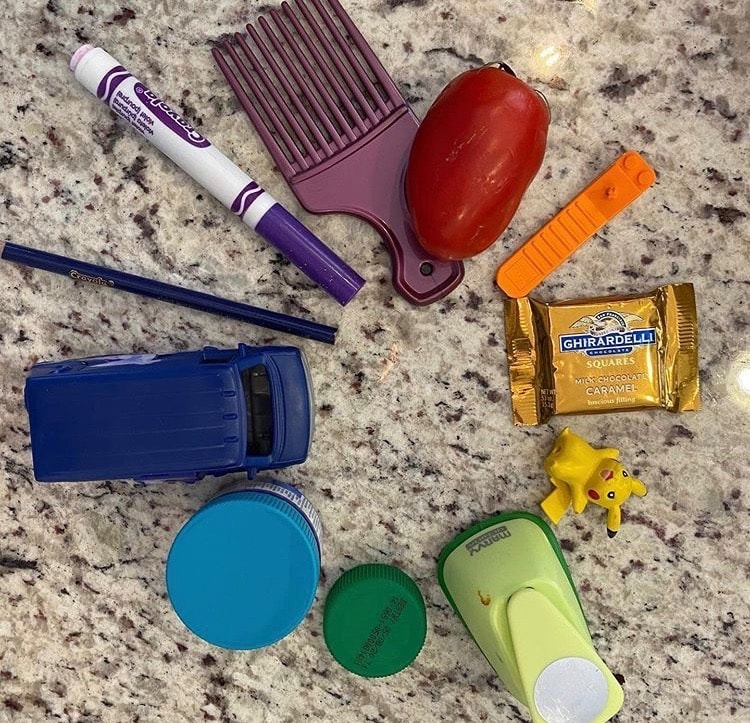
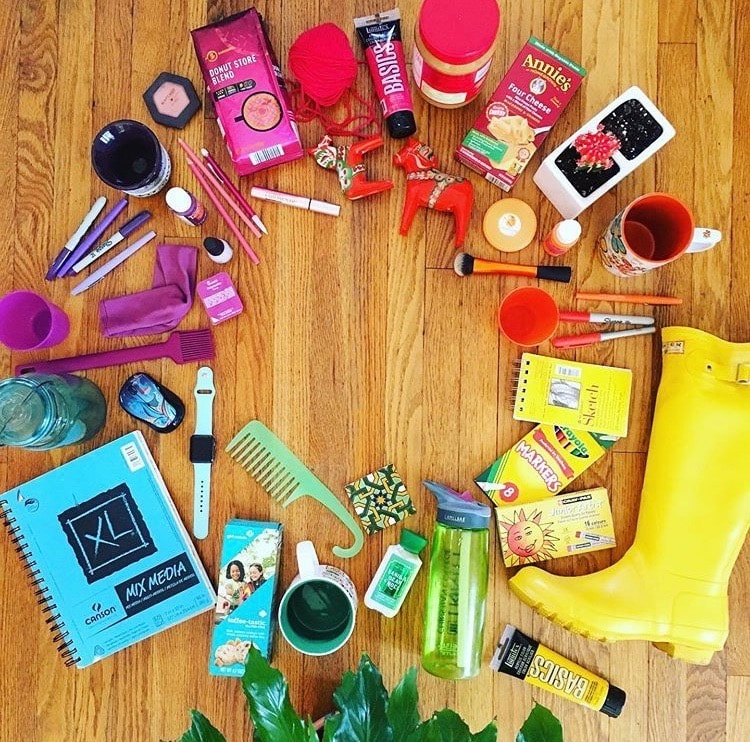
This week is ALL ABOUT COLOR!
I know many of you LOVE this music video about the color wheel :) Watch it again to refresh your memory about the Primary, Secondary, and Tertiary colors found in the color wheel.
Advanced Colors Song Link Here: www.youtube.com/watch?v=fph81KVY6f8
THEN, your assignment for this week is to create your own color wheel with object you can find around your house.
I have posted many photos below of examples of "found object color wheels" other people have created to inspire you!
Once you have created your own color wheel, take a picture and upload it to the "Share Your ART" page of this blog.
Directions on how to post are located on the page. Have fun creating!!
|
|
Art Lesson for March 23-27
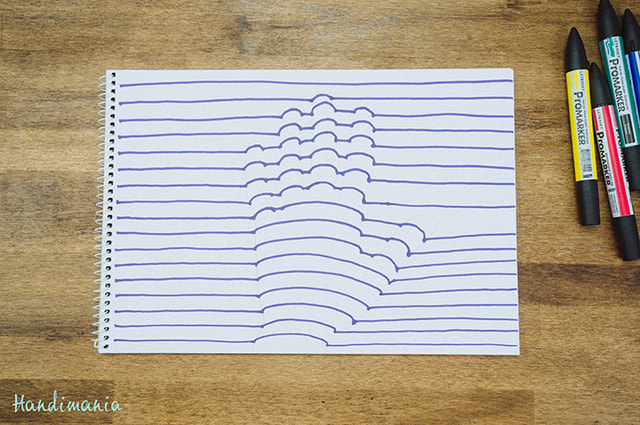
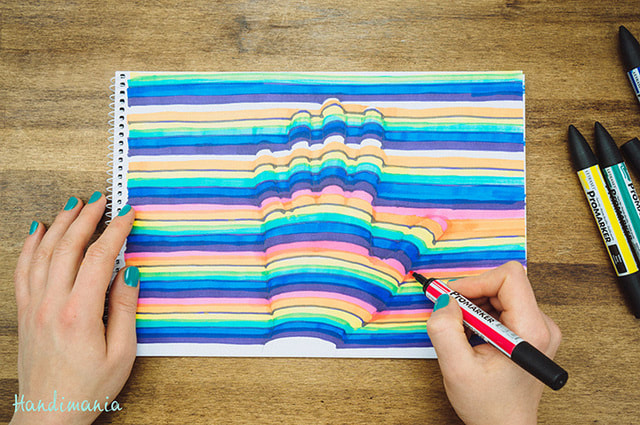
Students, we have talked about Optical Illusions in class before and have even created some of our own. This week, try this simple 3D hand illusion using markers or colored pencils. This illusion works with ANY colors (although colors that create the most contrast work best!)
To complete this illusion, you will need:
1 piece of plain, white paper (computer paper works best!)
Crayons OR colored pencils OR markers (any of them will work)
A ruler (if you don't have a ruler, you can use a magazine or cereal box. You just need something with a straight edge.)
Art Vocabulary:
Optical Illusion- Optical illusions use light, patterns, and color to create images that trick your brain
Contrast- A principle of art that refers to the arrangement of opposite elements (light vs. dark colors) Ex: Complementary colors are great examples of colors that create contrast! Yellow and Purple, Red and Green, Blue and Orange.
To get started, read the directions AND look at the pictures for further understanding! There is also a link to a video tutorial at the bottom.
Directions:
Step 1: Trace your hand in the middle of your paper. Include your wrist and lower part of your arm that goes off the paper.
Step 2: Using the art material of your choice (crayon, colored pencil, or marker) and ruler, draw straight stripes from the left side of your paper to the right side of your paper BUT don't draw through your hand or fingers. Those parts remain blank.
Step 3. Connect the two sides together by by drawing a curved line through the hand and fingers at each stripe. (The pictures demonstrate this part best.)
Step 4. COLOR using contrasting colors!
VIDEO TUTORIAL: youtu.be/YNEXzvnD7mI
Source: https://laughingsquid.com/how-to-draw-a-3d-optical-illusion-of-your-hand/
|
|
Art lesson for march 16-20
Students, Check out this book called "Snappsy the Alligator" and then try your best to draw a realistic crocodile by using our favorite YouTube drawing channel, Art For Kids Hub! Remember, when something is "realistic" that means it looks real and not like a cartoon. This drawing may be a little challenging, so make sure to take your time and pause the video if you need extra time! Press lightly with your pencils, so you can erase easily!
Links here: Snappsy the Alligator (click link to listen) AND How to Draw a Realistic Crocodile (click link to draw)
Links here: Snappsy the Alligator (click link to listen) AND How to Draw a Realistic Crocodile (click link to draw)
