art lesson may 4-8
This week we will be creating "Mural Art to Make People Smile"
Start by watching this YouTube video reading of our classroom book, Maybe Something Beautiful written by F. Isabel Campoy and Theresa Howell, illustrated by Rafael Lopez. www.youtube.com/watch?v=nL5TzKaDXzA
In the book, "Maybe Something Beautiful" Mira meets a man with an art job. What does he do? Yes, he’s a muralist. A muralist is an artist who designs, paints and/or creates large paintings on walls and ceilings. Some cities hire muralists to paint on public buildings or structures.
Have you ever seen murals around your area before?
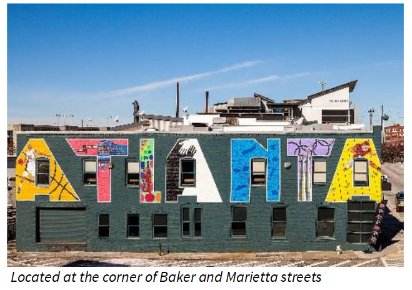
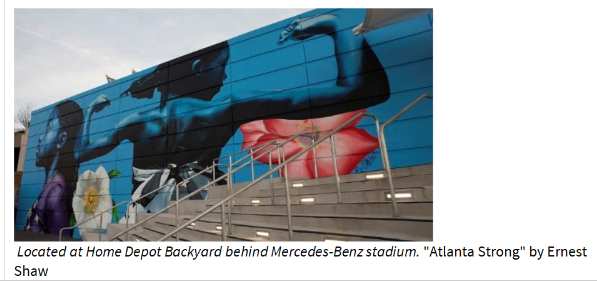
Here are some examples from towns in our area:
Start by watching this YouTube video reading of our classroom book, Maybe Something Beautiful written by F. Isabel Campoy and Theresa Howell, illustrated by Rafael Lopez. www.youtube.com/watch?v=nL5TzKaDXzA
In the book, "Maybe Something Beautiful" Mira meets a man with an art job. What does he do? Yes, he’s a muralist. A muralist is an artist who designs, paints and/or creates large paintings on walls and ceilings. Some cities hire muralists to paint on public buildings or structures.
Have you ever seen murals around your area before?
Here are some examples from towns in our area:
After looking at these examples, use your best drawing/painting/coloring skills to:
1) Create an artwork for someone that will put a smile on their face. Think about what they like and put that in your artwork.
2) Take a photo of your artwork and text or email it to the person you made it for. You could also mail them the artwork or photo with a letter. 3) How could you turn your artwork into a mural? Where would you paint your mural? Why?
Feeling inspired?
Create an artwork for your neighborhood! You can make a sidewalk chalk mural, create art from nature, or make and artwork and hang it in a window. Always ask for help from adults when you use art materials!
art lesson april 27-may 1
Art Zoom meeting with Mrs. Stevens will be Tuesday, April 28th from 11-11:30 am! The link is on your teacher's classroom blog :) I hope to see you there! For those of you who can't make it, we will be making leaf rubbings. The directions to make your own leaf rubbings are below:
Supplies:
Directions:
1. Put a leaf upside down on the table.
2. Place a piece of paper over the leaf.
3. While holding the paper and leaf in place, use the side of a crayon to rub across the leaf.
4. Make sure that you color over the entire leaf. Rubbing firmly all over the leaf will show the veins and the outline of the leaf
5. A dark crayon will produce a clearer print of the leaf.
6. Do another leaf with different color crayon OR trying mixing two colors to see what happens :)
Be creative.
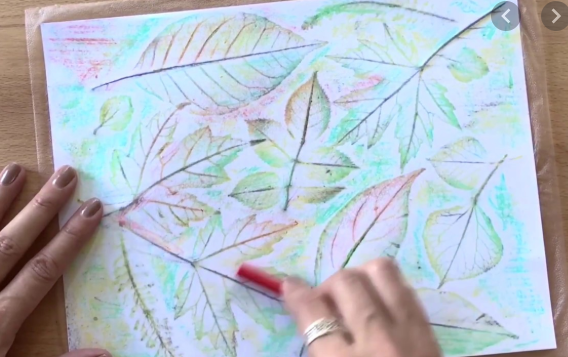
Example of what our leaf rubbings will look like:
Supplies:
- Different sizes and shapes of tree leaves
- paper
- crayons without the wrapper on them
Directions:
1. Put a leaf upside down on the table.
2. Place a piece of paper over the leaf.
3. While holding the paper and leaf in place, use the side of a crayon to rub across the leaf.
4. Make sure that you color over the entire leaf. Rubbing firmly all over the leaf will show the veins and the outline of the leaf
5. A dark crayon will produce a clearer print of the leaf.
6. Do another leaf with different color crayon OR trying mixing two colors to see what happens :)
Be creative.
Example of what our leaf rubbings will look like:
art lesson april 20-24
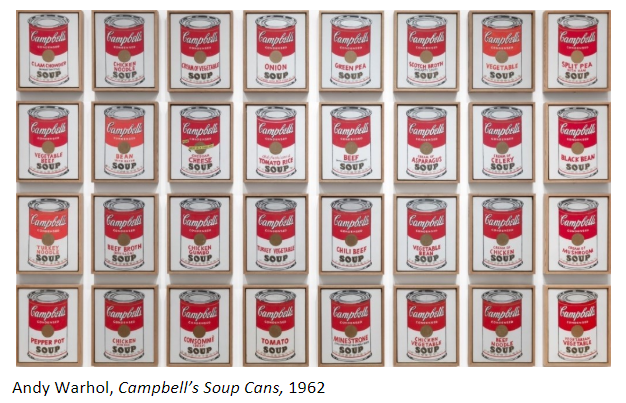
Did you know that Andy Warhol ate the same thing for lunch every day: a can of tomato soup?
He said, “I used to have the same lunch every day, for twenty years, I guess, the same thing over and over again.”
Andy Warhol would make artwork of the cans of soup because he knew other people would recognize the packaging.
Today, make a drawing of what you like to eat for lunch. How will you represent, or show, your meal?
Add in bright colors that will make your art “pop”.
First, watch this video to learn about Pop Art: www.youtube.com/watch?v=DhEyoDCTSDQ
Then, share what you learned about Pop Art with 3 family members :)
Next, Read the picture book “Uncle Andy” about Andy Warhol: www.youtube.com/watch?v=38GvgFYsAcw
Then, share with a family member 3 interesting facts you learned about the artist, Andy Warhol.
Ready to get creative?
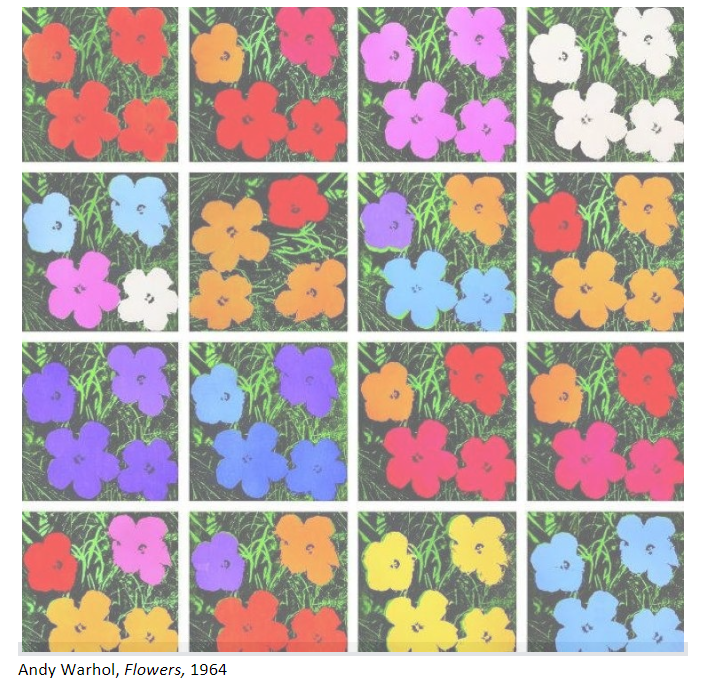
Use the artwork below by Andy Warhol to create your Andy Warhol- inspired Pop Art meal! You can simply draw your meal on any paper you have on hand and use any art material you have available to add color!
Share your artwork by posting a picture of it on the Share Your Art page of this blog!
He said, “I used to have the same lunch every day, for twenty years, I guess, the same thing over and over again.”
Andy Warhol would make artwork of the cans of soup because he knew other people would recognize the packaging.
Today, make a drawing of what you like to eat for lunch. How will you represent, or show, your meal?
Add in bright colors that will make your art “pop”.
First, watch this video to learn about Pop Art: www.youtube.com/watch?v=DhEyoDCTSDQ
Then, share what you learned about Pop Art with 3 family members :)
Next, Read the picture book “Uncle Andy” about Andy Warhol: www.youtube.com/watch?v=38GvgFYsAcw
Then, share with a family member 3 interesting facts you learned about the artist, Andy Warhol.
Ready to get creative?
Use the artwork below by Andy Warhol to create your Andy Warhol- inspired Pop Art meal! You can simply draw your meal on any paper you have on hand and use any art material you have available to add color!
Share your artwork by posting a picture of it on the Share Your Art page of this blog!
|
|
art lesson april 13-17
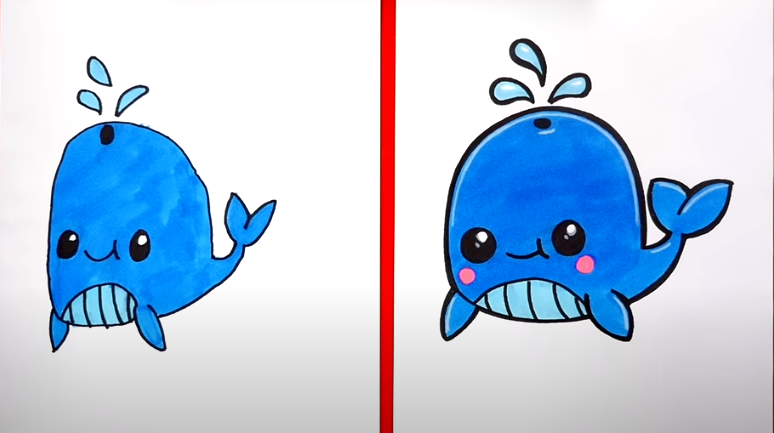
This week, Mrs. Stevens is really missing the beach!
In celebration that its almost summer, we are going to draw a funny whale with the help of our friends at Art for Kids Hub! Remember, when you're following along with the drawing video, if they go too fast, you can PAUSE the video to catch up. After you have drawn your whale, add your own unique details along with any other ocean animals you would find under the sea.
Link Here: www.youtube.com/watch?v=qJUclowq0J8
Art LEsson march 30-april 3
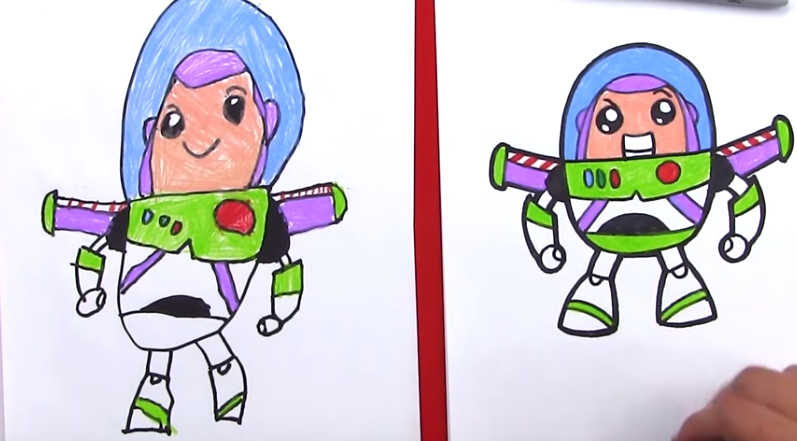
This week is all about superheros! One of my favorite superheros from my childhood is Buzz Lightyear! Lets see if you can try drawing Buzz with the help of our friends at Art For Kids Hub!
To complete this drawing, all you need is....
Here is the Art for Kids Hub "How to draw Buzz" link: www.youtube.com/watch?v=0srd_PwKUaU&list=PLnoO3k54vcBQreO1U5QNAOalsEwXOBbJV&index=21
To complete this drawing, all you need is....
- Something to draw with (pencil is best!)
- A piece of paper
- Something to color with (can be anything...crayons, markers, colored pencils... or a mix of all 3!)
Here is the Art for Kids Hub "How to draw Buzz" link: www.youtube.com/watch?v=0srd_PwKUaU&list=PLnoO3k54vcBQreO1U5QNAOalsEwXOBbJV&index=21
lesson for march 23-27
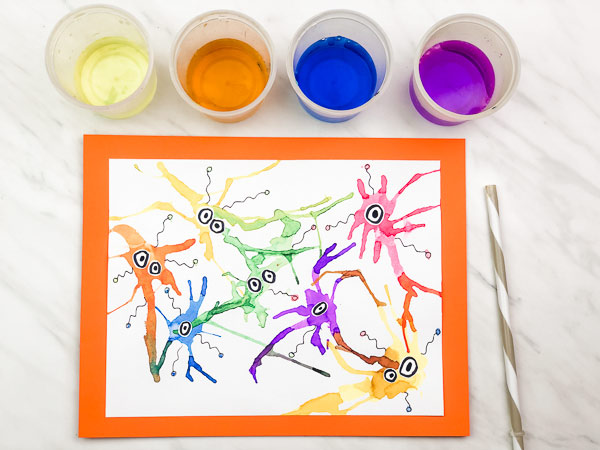
Germ "blow painting art"
This week we are creating cute germs! (Is there such a thing? I think there is!)
This germ blow painting art is perfect for preschoolers AND kindergartners when learning about sickness, the human body, and the immune system.
Resources for this art project, including a video tutorial can be found here: https://www.simpleeverydaymom.com/germ-blow-painting-art/?utm_medium=social&utm_source=pinterest&utm_campaign=tailwind_tribes&utm_content=tribes&utm_term=717350312_28532726_105037
Before starting the art portion of this project, listen to the book "Germs Are Not For Sharing" by Elizabeth Verdick. If you don't have the book at home, here is a link to a read aloud: www.youtube.com/watch?v=YCq3Ft_s-5s
After listening to the book, discuss germs with your student and how to protect ourselves from illness by taking care of our bodies and washing our hands.
Now we are ready for the fun part...
For this project you will need:
If you don't have watercolor paints at home, you can use juice (grape or cranberry juice would work great!) Food coloring in water will also work. Both of these alternatives will dry a little more transparent than watercolor paints, but otherwise will look very similar.
Germ Art Directions:Pour your liquid watercolors into an art palette or paint cups.
Use a paintbrush to add a small puddle of paint onto the paper.
Place the straw about an inch away form the puddle. Use the straw to blow the paint blobs around in all directions. Try blowing down directly onto the puddle, blowing from the left and blowing from the right. See how many different shapes you can make with the watercolors.
Repeat this step with each of the colors.
Let the paint dry completely (should take about 15 minutes; if you need these done quick, you can use a blow dryer as well).
Cut circles from the white paper and glue them onto the blow paint germs. (This is to make the white part of the eyes!)
Use a black marker to draw the eyes onto the germs.
Again, to watch a video tutorial of this project, please click here: www.simpleeverydaymom.com/germ-blow-painting-art/?utm_medium=social&utm_source=pinterest&utm_campaign=tailwind_tribes&utm_content=tribes&utm_term=717350312_28532726_105037
Lesson for March 16-20
Students, check out this read aloud book called "Mice Twice" and then try your best to draw a cartoon mouse and a block of cheese with mice. Once you finish drawing your mice, you can make them any color you want and be sure to add more details to fill your entire paper! You could add details like other mice friends, a cat, a dog, more cheese or more food for your mice to eat, and more!
Links here: Mice Twice (click link to listen) AND How to Draw a Cartoon Mouse (click link to draw) AND How to Draw Cheese with Mice
Links here: Mice Twice (click link to listen) AND How to Draw a Cartoon Mouse (click link to draw) AND How to Draw Cheese with Mice
